Sunday, December 30, 2012

Your Dutch Door ....... why not !

The Dutch Door (a pair of half doors) was common in the Netherlands in the seventeenth century and appears in Dutch paintings of the period. They were also commonly found in the Dutch cultural areas of New York and New Jersey before the American Revolution.  The initial purpose of this door was to keep animals out of farmhouses, or keep children inside, while allowing light and air to filter through the open top. They were also an intregal part of trains, for the conductors and passengers safety
Woman at a Dutch Door, 1645,
 by Samuel van Hoogstraten
Woman at a Mendocino Dutch Door


CLICK ON ANY IMAGE TO ENLARGE

The Dutch Door offers a certain freedom to a room or home.  It lets the outside in and keeps the outside out.  Most Dutch Doors open inward and are almost a secure as a single door if they are connected together mechanicaly.  My clients love the beauty of wood and the beauty of their surroundings.  I believe they want to bring the environs into their home, kitchen, or studio, as much as possible.
Here is a view from the inside
what a nice view
Here is a close-up of the styles of hardware
 we used.  Both halves lock with keys.


The "excitement" at Mendocino Doors is that the client gets to design his or her Dutch Door.  Some folk wish to have multi-light panes or single lite arched-top.  It is your door and you get to help me design it.  You can design simple panels, art glass, or even a dentil shelf. The Dentil Shelf is attached to the Dentil Posts with stainless steel screws and covered with rosewood pins.  How would you want your Dutch Door?
The Dentil Shelf
The panels are Curly and
Burl Redwood
The "half-lap" joint has
weatherstripping


Soooooo ..........if you might ever want a Dutch Door, just give me a call or drop me a note and we'll design your door together, and you can make your dreams come true.
Here is a Dutch Door we
just finished

You can go to MendocinoDoors.com and go to The Magnolia Hill Dutch Door to see some more pictures of the construction and completion of this beautiful door.

Thanks for taking your time to listen to me ramble !


Friday, December 14, 2012

One doormakers solution ........

Here is One doormakers solution to the everlasting question.......
"How do you hang a wreath
on a Craftsman Door with no nails?"

A client asked me this very question so I laid awake a few nights before 
I came up with this solution.


Take a thin ribbon of any width and cut it long enough to tie around your bow
 or fasten it to your bow


CLICK ON ANY IMAGE TO ENLARGE


My Dentil shelves are about 1/16" off of the door surface for water drainage,
 so slide both ends of the ribbon down behind the shelf


Here I am using a dowel to show you the principle, but......


you can use a much smaller item like a toothpick or the shaft of a Q-tip


mark the toothpick to the width of the ribbon


cut off the excess and pull the ribbon tight


Now just attach the wreath to your ribbon ....... and
Have a Very Merry Christma!


and please visit Our Site again

Friday, November 16, 2012

The Challenge of Contemporary and Conservation ..... with style!

Question:
  How do you make a modern contemporary door using salvaged, recycled, and green materials ?
That was the question that I had to ask myself with a challenge of solving that situation while creating beautiful door.

"the rest of the story!"
    I was asked by a local contractor, known as Rosenthal ~ Thorton Construction, if I could make a door similar to a sketch provided by their designer, Ron Press.


My first response was ......... SURE ......... then the caution sign started flashing and the sirens started getting louder.  Why you ask ?  Back in the 1400’s most of the doors were plank style doors made of boards attached together to fill the hole in the wall.  Cut lumber, even though it is no longer growing,  still swells and shrinks due to seasonal and climatic changes.  This can mean that several boards fastened together would swell up in the rainy season and actually bind so tight that the plank door would swell to the point of not opening without a stiff shoulder and a running start.  So that is the primary reason for developing a frame-and-panel door that really has only the outside boards that will swell and shrink.

So there must be a solution .......... and there is.
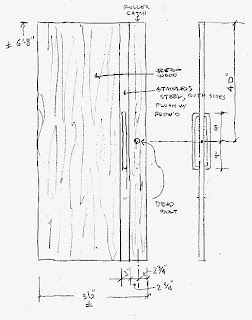
Take a 100% recycled waterproof substrate (core), edge it with Redwood (2”), on all four sides, and face it with  book-matched thick veneers that give the plank appearance, but won’t swell and shrink during seasonal changes.

Now before you think of the postcard thin mass-produced veneers, as seen on most doors and furniture these days, think of slices of wood about 5/16” thick.   We sawed these planks from vertical grain Old Growth Redwood lumber 


Then we take these thick veneers and make two large sheets and adhere these beautiful pieces of wood  to the inner core made of  recycled material.  This material will have to remain a “secret” for now, but it’s pretty cool! These faces we adhered with my ever faithful waterproof glue in a vacuum press.  This press is like a giant “seal-a-meal” that exerts 1750 lbs of pressure on every square inch of surface.  And I keep these pieces  in my press for at least 72 hrs (3 days), until it is fully cured.


Next, after sanding, came the the inlay of a 3” wide stainless steel strip, on each side.  This was “sorta” tricky, but we got it done and each piece wraps both ends and is affixed with stainless steel screws.

By the way, 90% of the consumer market stainless steel come from recycled sources.
According to the International Stainless Steel Forum; unlike other recyclable materials, 85% - 95% of stainless steel does wind up being recycled - very little winds up in landfill. The is  because stainless steel is so precious and durable.” (Sourcing http://www.greenlivingtips.com).


Last but not least, we found stainless D handles that we mounted on both sides.  They wanted handles that mounted without visible mounting brackets and we found this hardware through a wonderful online company called KnobDeco (http://www.knobdeco.com).  I think you’ll agree these handles are like candles on the cake!

If you are interested in viewing more of this door, please visit our Door Gallery and check out The Sea Cliff Entry.

I also would like to invite any questions you may have regarding custom doors, gates, or stained glass.

Sunday, October 28, 2012

Phew!! .......... what a day in the shop.

I sat back, at the end of the day on Friday, and gazed at the organized chaos that was spread out from floor to rafter and covered the benches with pieces of upcoming projects.  The shop looks like a disaster, but it is all methodically thrown together (or apart).

For instance, along side my table saw/bench, as you walk in there is an 8 ft template of a transom we’ll be making soon

This will fit into an arched jamb that is above a grand entry with two sidelights.


We cleared the center bench to lay down a door (for wrapping) that will be picked up on Sunday. by a client who will travel across the state to view his new entry door


When a client takes the trouble to come to our little corner of the world I like to turn on some spotlights and unveil their door ........ it’s very rewarding to watch their reaction to seeing and touching their new door in person.


While I was waiting for some thick veneers to be sanded for a round top door jamb (coming up), I made a template for my wife make her next stained glass window.  It will have an arched top and have a Coastal Cypress scene.


By making an accurate template she is able to take her finished piece and have it set into insulated glass


Yesterday morning I finished laying out and mortising for two garden gates and they were glued up in the afternoon, and put to rest (glue cure) for at least 3 days. 


A gentleman wrote me and asked for an estimate on a similar gate design ........... so I decided to make a “couple” gates to be able to give a “real and factual” estimate.  I’ll keep you posted.


After resawing and gluing 6 pieces, we placed them in a form where they will stay for 3 days.  These pieces will make the top of the door jamb for an upcoming arched top door for a gentleman outside Chicago.


The best method (I believe) to make an arched top door is to make the jamb, in which it will fit, first and then use that as a template for the top of the future door.


Along the same forethought, I have built a round top Redwood door, making the jamb first, so I now have to make an arched stop for the top of the jamb


The 2-3/4” wide stop, mirrors the arched stop.  It even has a built-in-groove that will receive the weather stripping.


Oh yes .......... since we make arched top gates I realized that we needed arched stops for the top stops of the gates
All of my arched stops are multiple thin boards  that are laminated together in a proper thickness to match the other stops to be used in these beautiful gates.


Then there was 3 different projects (to come soon) which will require 2 layers of marine plywood to be laminated together.


These pieces full of clamps help add to the “organized chaos” as I gazed about the room.


But wait, there’s more !! ............... between my two main benches is this monolith of a solid (appearing) Redwood Plank door, on its edge with these funny clamps, pressured to plywood strips, which will have been clamped at this juncture for 5 days.


These clamped plywood strips are applying constant  pressure on two stainless steel 3” wide strips.  The stainless strips will have the 18” pulls (picture above) at handle height.  Please come back to see the finished entry door.


Last but not least, we have a very simple, yet elegant, quarter sawn White Oak door that will grace a restored miners cabin in the hills above Death Valley, California


above are the Quartersawn White Oak panels in the vacuum press. The fact is ........ I have so much in clamps, I thought I’d share the “chaos” with you.


Please visit our Current Projects Page to see some of what we are working on, and all of the craftsmanship that goes into each door.

Also, please visit Our Door Gallery to see a variety of uniquely crafted custom doors.