Showing posts with label custom construction. Show all posts

Sunday, April 7, 2013

New Doors for a Beautiful Home


Back in September I wrote 2 blogs (Sept 9th and the 24th ~ see below) about some custom doors for a home being built on the Redwood Coast.  Well the building is closed in now and we're building the exterior doors.  They will have 3 different designs.  Two simpler doors on the lower floor will have a nice design with a 4 lite top half.  The Great Room doors will have a bit more of a "flowing" design with arched top panels and 9 lites of Seedy Reamy insulated glass.  The grand entry will have another elegant door with arched top panels, nine lites, a dentil shelf, and beveled glue chip glass.  The entry will also have two sidelights and an arched transom with a strained glass Coastal scene by Zoleta Lee Designs.  Below are some progress pictures of the house.  Work on it has been stopped for the winter but work has been ongoing with the doors.  More to come soon!


Walking around the property, looking at all the preparations, walking through the rough framed home, and imagining just where the doors will hang for decades to come........ pretty cool.  Years of planning, earth moving, layout, milling logs, drying that lumber, and starting construction shows the love and care that is going into this gentleman's future dream home.


The garage and generator buildings are used to store building materials.  All of the site-sawn lumber was graded on site and air dried in a custom drying shed, pre-sealed and oiled on site, then stored under reflective tarps until it time to be used on the home.

Click on Any Image to Enlarge


The home will over look the meadow below, a forest to the East, and the Pacific Ocean is less then a mile to the West.  On a clear day the blue Pacific gleams on the horizon, inviting the viewer to hours of staring into the “future” with an afternoon of peaceful thoughts.

Months ago the owner started sorting out different designs for his doors.  Taking what he already had on the structures he had on his property, he added little details and varied designs.  I think I drew 3 or 4 different designs for the lower doors and his Great Room doors.  We changed some of the sizes, due to framing changes, and settled on the final designs.  Custom really means custom.


The owner has decide on Ribbon Grain VG Mahogany with figured Old Growth Redwood panels.  Some of the glass will be clear and some will be a textured art glass, called Seedy Reamy.  All of the glass will be tempered and insulated.


For more unique custom doors please visit our Website.


Sunday, December 30, 2012

Your Dutch Door ....... why not !

The Dutch Door (a pair of half doors) was common in the Netherlands in the seventeenth century and appears in Dutch paintings of the period. They were also commonly found in the Dutch cultural areas of New York and New Jersey before the American Revolution.  The initial purpose of this door was to keep animals out of farmhouses, or keep children inside, while allowing light and air to filter through the open top. They were also an intregal part of trains, for the conductors and passengers safety
Woman at a Dutch Door, 1645,
 by Samuel van Hoogstraten
Woman at a Mendocino Dutch Door


CLICK ON ANY IMAGE TO ENLARGE

The Dutch Door offers a certain freedom to a room or home.  It lets the outside in and keeps the outside out.  Most Dutch Doors open inward and are almost a secure as a single door if they are connected together mechanicaly.  My clients love the beauty of wood and the beauty of their surroundings.  I believe they want to bring the environs into their home, kitchen, or studio, as much as possible.
Here is a view from the inside
what a nice view
Here is a close-up of the styles of hardware
 we used.  Both halves lock with keys.


The "excitement" at Mendocino Doors is that the client gets to design his or her Dutch Door.  Some folk wish to have multi-light panes or single lite arched-top.  It is your door and you get to help me design it.  You can design simple panels, art glass, or even a dentil shelf. The Dentil Shelf is attached to the Dentil Posts with stainless steel screws and covered with rosewood pins.  How would you want your Dutch Door?
The Dentil Shelf
The panels are Curly and
Burl Redwood
The "half-lap" joint has
weatherstripping


Soooooo ..........if you might ever want a Dutch Door, just give me a call or drop me a note and we'll design your door together, and you can make your dreams come true.
Here is a Dutch Door we
just finished

You can go to MendocinoDoors.com and go to The Magnolia Hill Dutch Door to see some more pictures of the construction and completion of this beautiful door.

Thanks for taking your time to listen to me ramble !


Friday, November 16, 2012

The Challenge of Contemporary and Conservation ..... with style!

Question:
  How do you make a modern contemporary door using salvaged, recycled, and green materials ?
That was the question that I had to ask myself with a challenge of solving that situation while creating beautiful door.

"the rest of the story!"
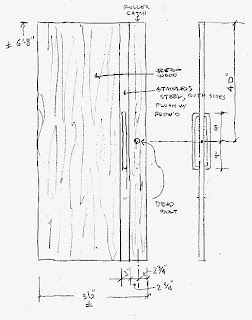
    I was asked by a local contractor, known as Rosenthal ~ Thorton Construction, if I could make a door similar to a sketch provided by their designer, Ron Press.


My first response was ......... SURE ......... then the caution sign started flashing and the sirens started getting louder.  Why you ask ?  Back in the 1400’s most of the doors were plank style doors made of boards attached together to fill the hole in the wall.  Cut lumber, even though it is no longer growing,  still swells and shrinks due to seasonal and climatic changes.  This can mean that several boards fastened together would swell up in the rainy season and actually bind so tight that the plank door would swell to the point of not opening without a stiff shoulder and a running start.  So that is the primary reason for developing a frame-and-panel door that really has only the outside boards that will swell and shrink.

So there must be a solution .......... and there is.
Take a 100% recycled waterproof substrate (core), edge it with Redwood (2”), on all four sides, and face it with  book-matched thick veneers that give the plank appearance, but won’t swell and shrink during seasonal changes.

Now before you think of the postcard thin mass-produced veneers, as seen on most doors and furniture these days, think of slices of wood about 5/16” thick.   We sawed these planks from vertical grain Old Growth Redwood lumber 


Then we take these thick veneers and make two large sheets and adhere these beautiful pieces of wood  to the inner core made of  recycled material.  This material will have to remain a “secret” for now, but it’s pretty cool! These faces we adhered with my ever faithful waterproof glue in a vacuum press.  This press is like a giant “seal-a-meal” that exerts 1750 lbs of pressure on every square inch of surface.  And I keep these pieces  in my press for at least 72 hrs (3 days), until it is fully cured.


Next, after sanding, came the the inlay of a 3” wide stainless steel strip, on each side.  This was “sorta” tricky, but we got it done and each piece wraps both ends and is affixed with stainless steel screws.

By the way, 90% of the consumer market stainless steel come from recycled sources.
According to the International Stainless Steel Forum; unlike other recyclable materials, 85% - 95% of stainless steel does wind up being recycled - very little winds up in landfill. The is  because stainless steel is so precious and durable.” (Sourcing http://www.greenlivingtips.com).


Last but not least, we found stainless D handles that we mounted on both sides.  They wanted handles that mounted without visible mounting brackets and we found this hardware through a wonderful online company called KnobDeco (http://www.knobdeco.com).  I think you’ll agree these handles are like candles on the cake!

If you are interested in viewing more of this door, please visit our Door Gallery and check out The Sea Cliff Entry.

I also would like to invite any questions you may have regarding custom doors, gates, or stained glass.

Monday, September 24, 2012

Let's get ready for this project!


Walking around the property, looking at all the preparations, walking through the rough framed home, and imagining just where the doors will hang for decades to come........ pretty cool.  Years of planning, earth moving, layout, milling logs, drying that lumber, and starting construction shows the love and care that is going into this gentleman's future dream home.


The garage and generator buildings are used to store building materials.  All of the site-sawn lumber was graded on site and air dried in a custom drying shed, pre-sealed and oiled on site, then stored under reflective tarps until it time to be used on the home.

Click on Any Image to Enlarge


The home will over look the meadow below, a forest to the East, and the Pacific Ocean is less then a mile to the West.  On a clear day the blue Pacific gleams on the horizon, inviting the viewer to hours of staring into the “future” with an afternoon of peaceful thoughts.

Months ago the owner started sorting out different designs for his doors.  Taking what he already had on the structures he had on his property, he added little details and varied designs.  I think I drew 3 or 4 different designs for the lower doors and his Great Room doors.  We changed some of the sizes, due to framing changes, and settled on the final designs.  Custom really means custom.


The owner has decide on Ribbon Grain VG Mahogany with figured Old Growth Redwood panels.  Some of the glass will be clear and some will be a textured art glass, called Seedy Reamy.  All of the glass will be tempered and insulated.


For more unique custom doors please visit our Website.


Sunday, August 26, 2012

Soooo .... Let's Build-a-Door


I thought it might be informative to show a few pictures of the process of making a custom door.  This segment will be devoted to creating the door. 

I start with rough sawn 2” thick material that I cut oversized then the finish piece 


I joint each piece on its’ face to make it true and straight.  Then I surface each piece down to a 1-13/16” thickness.  After the rough lumber is surfaced, I joint an edge to make the stock straight and square.  Then each piece is cut to width and length and sized to my calculations for each piece.  I then layout the mortise pockets and the dowels, which I make myself out of Mahogany or White Oak (these woods don’t rot like commercial Birch dowels)
When all of the pieces are ready for assembly, they are laid out over the bench an pre-glued 3 times with the exterior glue I’ve used for 30 years without a failure. 


 After every piece is pre-glued, we start putting the door together from the bottom to the top.


When all of the pieces are put together we go to extraordinary efforts to clamp the door, flatten all the joints, and clamp the pieces from side to side and top to bottom.


Then I start cutting out the sidelights, two, and the process happens all over again


Each door is constructed with the same methodical steps, never taking short cuts or making compromises in the construction of each door, sidelight, or transom.
oh ........ by the way ...... the same attention to detail goes into each interior door, garden gate, or driveway entry gate.


There is this reminder on my shop wall,
                                 “if you don’t do it right the first time, when will you have time to do it over

Please visit Our Site and my Door Gallery to view the actual construction of over a hundred doors.  I build a web site for each client to view the construction of their individual door(s), and it offers you a chance, to see for yourself, the craftsmanship and care that goes into each door.

CLICK HERE to return to my site.